Wednesday, 29 November 2023

Hello,
 
Today is my second DTM project for Country View Crafts and the challenge for November - Repurpose/Upcycle something. 
 
I decided to try something I’d watched on YouTube (tutorial by Treasure Books) and put my own slant on it - it’s making faux rice paper.

I assembled the bits I would need for my project:
Plunger coffee, Stamps, Napkin, Glue and Collage Paper, as well as a brush and backing sheet.

 
First I separated the napkin layers (peel apart a 2 or 3 ply napkin into separate layers),and keep a plain white one aside.
 

Using a napkin backing piece, I stamped over Tim Holtz Stampers Anonymous Sketched Leaves CMS467, and Urban Elements CMS398 on another one, in Archival Black Ink. 
 
 
I secured a piece of freezer bag to my work surface (plastic bag and craft mat will also be OK to use but DO NOT use Baking Paper - it will stick!). Then using a PVA glue and coffee mix (2/3 glue to 1/3 coffee or water ratio), I brushed this beneath and then on top of the napkin to coat it.  (You could also use beetroot juice after cooking, if you wanted a reddish tinge too.)


It was a nice dry day so I hung them outside to dry.
 

Once dry, I carefully peeled them away from the backing - the side that was on the plastic has a shiny look, whereas the upper side is matt. It has a crisp like texture and is also fairly see through.
 

 Here is a stamped one and the second ply part of a patterned napkin (so it's not full strength colour).


I decided to try some with an ombre dye ink pad - one was coated with just the PVA/coffee mix, and I coated another one with coffee grounds added too. All looked good until I hung them to dry, it ran - but I still used it and stamped on top of the accidental mishap afterwards with black Archival. Note to self - MUST use Archival/waterproof ink for this. 

 
I thought it would be nice to put it in a card with a cut out, so you can see the light through it and how 'transparent' it is. I assembled a die cut and a sentiment to add to it too.
 
 
Here are the finished cards - two have been made with a stamped on napkin piece and the other is Botanical Collage Paper by Tim Holtz Idea-ology. They're 4x4 inch cards and I glued the 'faux rice paper' to the inside of the card but you could also make a 3 fold card to cover the edges where it's glued inside, or you could use washi tape around them if you didn't want to see the edges.
 
This photo was taken with the light showing through.


With the range of stamps available to you, you can create a whole host of different design 'faux rice paper', suited to your needs. You can of course use the patterned napkin for this also. I also tried it with the Tim Holtz Collage paper which worked a treat too. 
I also used Tim Holtz Stampers Anonymous Tiny Text Christmas CMS424 and Noteworthy CMS446 to add a word(mounted on black card and raised with 3D foam), on top of a die cut from Tim Holtz Sizzix 661597 Holiday Greens Mini.
You don't have to just make cards with your 'paper', you can use it as collage for mixed media projects too.
 
It may seem like it's quite complex and time consuming to do, but it really isn't. The longest part is waiting for them to dry.

I really hope that you will be inspired by my make to have a go at the repurpose/upcycle challenge. Take a look at it now being hosted on Facebook here.  There is an amazing prize that one randomly selected winner will win! It's a Stamperia mould and retails at £19.99
 
Products used can be found on Country View Crafts 
https://www.countryviewcrafts.co.uk

Thursday, 9 November 2023

Easy Concertina Book


Hello,

I hope you're well. 

I have some exciting news for you...
I've been asked to be a Design Team Member for Country View Crafts store (in the UK) and to say I am chuffed, is an understatement. My first time on a DTM, so I am very excited to be part of the Team.

This is my first project for their November  Challenge on their page 'Country View Crafts and Challenges ' on Facebook- and it is 'Repurpose Something'. 

Here's a link to their page with all the details on how to enter. Country View Crafts And Challenges and there is an awesome prize to win. You can also find Tim's products on their website https://www.countryviewcrafts.co.uk/

Today I have a simple little book for you to make, that you could use your own photos in, or follow as I've done here, using the Tim Holtz Idea-ology Photomatic pack.

This cute little book is quite thin in size, so could easily be posted by Large Letter Mail (UK) as a nice little gift for someone.

I don't know about you, but I tend to hoard Amazon cardboard envelopes that the smaller parcels come in, with the intent to reuse them somehow, some time.

I decided to 'Repurpose' one of these to make my little book with. You should be able to get about 4 of these books out of one envelope if you use my specifications, but it'll depend on the size of the inserts that you use. If you wish the book to be longer, cut out and glue two concertina bases together, by overlapping a page at each end.

Peel off the labels carefully first.

Cut the sides and top edges off, and the middle one too.

The width across the envelope once cut and prepped is around 12.5 inches. 

I gauged it at 3" per 'page' because when you fold it, you lose a little off the width. So for this, I made it also 3" in height, making the book 3x3" as my 'photos' were the right size to fit it. You may wish to make yours taller, but the book will be thinner in width as compared to the height.

I also cut out some white card squares, measuring 2 3/4" 

I then folded my cut piece in half - I didn't measure it as I knew roughly what it would be, and then I folded one edge to the middle and then the other side to the middle too, to givce you this concertina look. Make sure to use the plain part (inside) of the Amazon envelope for your main side. Keep the side with their logo and markings underneath.

Adding Ranger Distress Inks Vintage Photo and Ground Espresso to my craft mat and spritizing with water, I dabbed the white squares randomly into the inks. I also scrunched some leftover ribbon into it too. I then used Ground Espresso with a blending tool to go around the edges.

I started to layout how I wanted it to be. I also stamped some type from Stampers Anonymous Faded Type CMS397 onto the inked squares.

And for the extra 'Repurpose' components, I removed some used postage stamps from their backing (by soaking in warm water) and once dry, I then blended over some Ranger Distress Vintage Photo ink to make them look older.

And finally I found some ephemera from Idea-ology Field Notes Snippets, just a few bits to add in.

I heavily inked around the front cover edges and added a panel to each one.

Then I added the panels to the inside of the concertina pages and lightly inked the edges of the pages.

I glued the ribbon to the back of the inside pages and then I glued these together so that you wouldn't see any 'Amazon' markings.

I then assembled my 'photos' and ephemera and glued them down once happy.
The book does not open out as a concertina like when it was first constructed, as I had glued the inside middle pages together so that you couldn't see the Amazon markings, so this one opens like a book.

For the final touch I added the words 'We are family' from the Tim Holtz Idea-ology Chit Chat Sticker book - I mounted these onto black card and lighly inked the edges with Range Distress Ink Black Soot.

Wrap around the ribbon and tie a bow to complete the look.

I hope you like my little 'Repurposed' Easy Concertina Book. Of course, you can use any backing you'd like for this, but this is just another way to reuse something that you may not have thought of using.

 Take care and thank you for stopping by.
Best wishes,
Carol


Thursday, 13 July 2023

Tim Holtz TV Challenge - Idea-ology

 Hello 

Over on the Tim Holtz Addicts Facebook page for the past few weeks, Tim has been having a TV Challenge - go to Youtube, pick one of his videos of his chosen subject for the challenge, and make something that inspires you from it.

Well, this week is all about his line from Idea-ology. I have a few bits of this but often forget to use it, so this was a good challenge for me to do.

So, I watched the video from the Idea-ology Collection 2022  release and was very inspired by the cards that Cheiron Brandon, one of Tim's Design Team made, to make some of my own. 

Tim Holtz Products used:
Ranger Distress Ink Ground Espresso and Rusty Hinge
Various Distress crayons 
Idea-ology marbled design tape; paper dolls portraits; transparent layers; Halloween droplets; label stickers; Halloween ephemera pack; paper stash Wallflower 

#timtvideaology
 
Instagram

Here’s two that I made and I aim to make more and put them together to form a little book, or else they could just be used as cards.


Here's the process I used to make the card with the young lady...

First, I went through my stash and gathered all the bits together that I decided I was going to use.

I cut out the backing card out of Kraft card, rounded the corners and then distressed the edges with some Ground Espresso and Rusty Hinge Distress Inks.

I cut out the background paper from the Wallflower Paper Stash pad, with Tim's Deckle Trimmer from Tonic, and then I coloured parts the lady with Distress Crayons.

I added some Marbled Design Tape to the bottom before sticking on the background paper and design

From there, it was a matter of compiling the elements. To the background paper I added the transparency, then layered the young lady on top.

I attached the Halloween Droplets to the four corners, added a cut down piece from the Halloween Ephemera pack above the transparency (as the words were cut off and it looked odd to me), and fixed the owl with some foam tape to raise it up.

The label words 'In My Heart' were added to a piece of black card and then attached with black foam tape to raise it up too.

For the young man's photo, I put him behind the transparency but everything was compiled the same.

So there you have it, my Idea-ology make in the style of cards/book pages.

Monday, 29 May 2023

Comic Strip Storyline Tutorial

 Hello,

So, I'm currently participating in the 100 day project and my last 20 days of the project are using Tim Holtz Stampers Anonymous Crazy Birds, Crazy Cats and Crazy Dogs stamps.

I'm creating an ATC a day and making it into a comic strip type of storyline.
The story is basically, everyone lives in a land called Crazydom and it's how they all get along living together. It's not always in harmony it seems.

Day 94 of the 100 Day Project is using this storyline
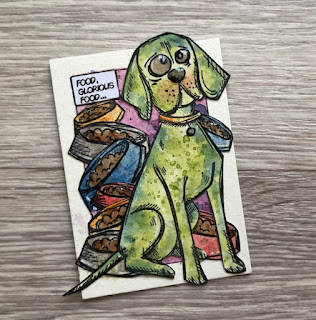
"Mindy is well known for her voracious appetite but she’s not flavour of the month in Crazydom, having eaten all of the other Crazy Cat’s and Dog’s dinners! Oops! And she’s not feeling too good now either."

Tim Holtz products used for this ATC are:
Stampers Anonymous Crazy Dogs CMS271 and Mini Crazy Cats and Dogs CMS272
Ranger Distress Ink Seedless Preserves and Chopped Sapphire
Ranger Distress Watercolours - various - to colour the images 

I create a 'story' for the day by looking at the stamps and sometimes various sayings from Idea-ology Small Talk Snarky, and then I run with it.

Here's my process for Day 94...

Mask the edges around the watercolour ATC card and do a wash using Distress Ink colour of choice.

Once you have done your wash, choose the same colour, or two colours to splatter over.

 
Outline your wash area with black pen - I used a Uniball pen.
 
 
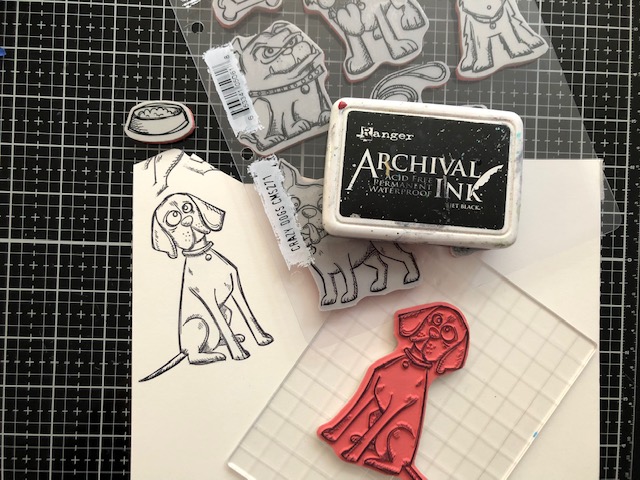
Stamp out your images using Archival Ink. This is waterproof as I'll be using Distress Watercolour pencils to colour them in.

Colour in images with Distress Watercolour Pencils.

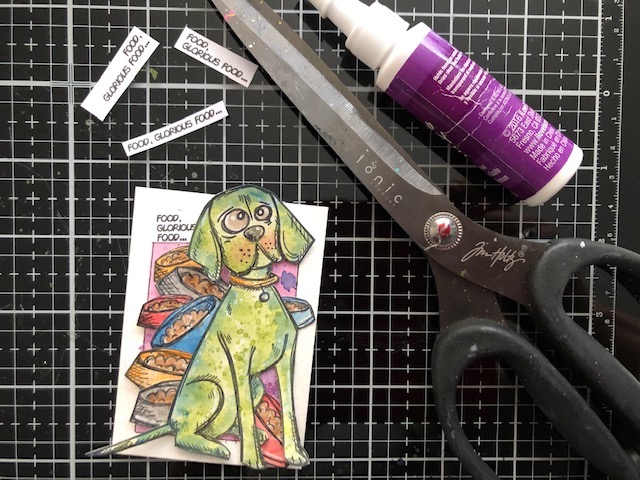
Fussy cut out the images or use the coordinating dies if you have them.

Gather all your components ready to lay out on your ATC. I've printed out the Caption 'Food Glorious Food' from my computer. Sometimes it's a bit of trial and error to make it all fit.

As you can see, my first Caption layout in one line, wasn't going to fit, so I printed it again to make it fit this time. Layout your images where they seem best suited and glue down.

 
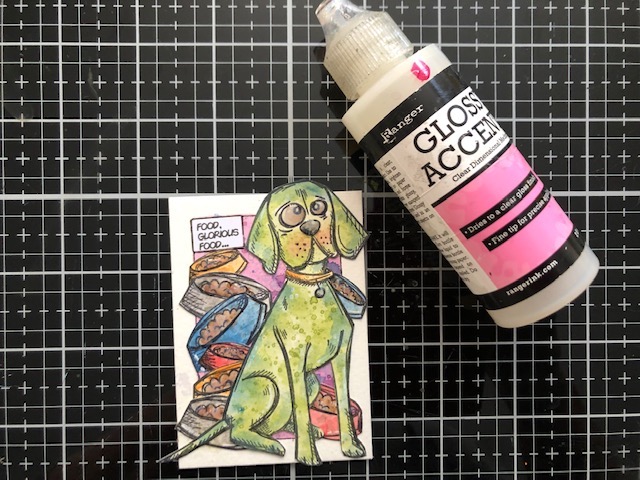
Outline the Caption at top left with your black pen.
Add some Glossy Accents to the eyes and nose. I also added some to the 'food' in the bowls.
   And here you have the final product.


Wednesday, 24 November 2021

 Hello,

What a lovely sunny frosty day we had here in London today.

Well, I haven't posted much this year as I didn't think anyone could see my posts. When I've done a google search nothing shows up and it's a bit demoralising as I can't think what I've done wrong with the set up on Blogger.

Anyway, I just saw... someone commented on one of my posts!!! EEK!! Someone actually found it!!! Yayyy!!

So here goes again with a short post of some makes :-)

Hope you like it.

Have a fab day

 xx


Wednesday, 24 February 2021

So, it's about time I started uploading some of my artwork for you to see.

 
The first day of every month is a new challenge on The Dylusions Facebook Challenge Page. This month I was honoured to be chosen as a Guest Designer. Here's my second interpretation, this time with those Mischievous Twins Malcom and Michael. The challenge prompt was orange, turquoise and cats.
 
All Dylusions Products except for the 'Other' category.

Inks: Tangerine dream, squeezed orange, vibrant turquoise (and lemon zest, desert sand and postbox red for the flesh colour)
Paint: Squeezed orange, vibrant turquoise 
Stencil: Edith (the small cat) 
Stamps: Mischievous Malcolm, doodle parts, a heck of hexes, puddy cat 
Other: Printed TV and text, diamantes, Black Archival Ink and black Uniball pen

Supplies: www.afth.co.uk 😊😊😊 
 
I found that doing the comic style layout is good for these two cheeky chappies, but it's not without it's challenges. For a start, I have a set size to work with, with the stamps and stencils. Therefore, getting them to fit in the boxes is a challenge. Then, there's the reading of each box - we go left to right, but as you can see in this layout, there's a large box at the beginning and at the end, so the middle line looks like it should go straight across. Hopefully the added arrow will point you in the right direction.
 
I hope you like my new addition today.
Have a great day and stay safe.

Crafty Adventurista xx


Friday, 15 January 2021

Hello and welcome to 2021

A new year that brings new hope... and a commitment from me to create a blog that will be full of inspiring articles and crafty things. It'll ensure I jump straight into crafting more this year. 

I have always been 'crafty' but I think waiting for the 'right time' to do things gets in the way. Well, there's never a 'right time' more than now. 

Creativity brings joy and there's no right or wrong way, although our inner critic will always be telling you otherwise. I've decided I need to kick that little Gremlim off my shoulder for once and for all.

How about you do that too (if you've got a Gremlin) and enjoy the crafting journey with me as I 'travel' the world - currently online - experiencing different brands and crafts that appeals to me.

Mostly I do papercrafts - mixed media art, gelliplates, rubber stamping, stencilling, die cuts and so on, but that doesn't mean I don't investigate other crafts.

Over the years, I have made cross stitch pictures, flower fairies, belly dance costumes (yes, belly dance costumes!), hand dyed silk veils, beaded jewellery, bookbinding, calligraphy and more. I always like to learn new things but for space constraints, I'm now concentrating more on papercrafts at the moment. (I could open a shop with the stuff I have!). It's about time to start using some of that stuff!

So I do hope you'll enjoy looking through my blog as it progresses along the way...

In the meantime, take care, stay safe and Happy Crafting

Crafty Adventurista xx

aka Carol 


August - DT Project 1 for Country View Crafts and Challenges - Monochrome

Hello, Happy August!  Here I am with my first DT post for August, for Country View Crafts and Challenges on Facebook.  The theme for this mo...