Monday, 9 September 2024

Autumn Richness - DT September Project 1 for Country View Crafts

Hello there,

Here I am with my first DT project for Country View Crafts and Challenges for September. The theme is Autumn Richness as chosen by our lovely Jane, and the prize for this month is an Alison Bomber Paperartsy Stamp Set and Collage Paper. 

You can enter 5 times each month with different projects and one winner will be selected randomly. 
You must use products from brands that Country View Crafts stocks, and please mention them in your post. If you miss this step out, we will not be able to enter your project in the draw. You can join in the challenge on Facebook and will need to have joined the group to participate. Here’s the link: https://www.facebook.com/groups/164920247712393

So I made a card in Autumn colours with a Reindeer from the new stamps release by Kate Crane Paperartsy. Well, a Reindeer doesn’t just have to be for Christmas right? 

I started by smooshing Tim Holtz Distress  inks Gathered Twigs, Ripe Persimmon and Dried Marigold onto a 4x4 inch background card. I also gave it a spritz with Tim Holtz Distress Spritz Spiced Marmalade. 
 

Next, I inked up the new release stencil from Kate Crane Paperartsy, with Tim Holtz Distress Inks Scorched Timber and Barn Door. I spritzed this with water, then laid down into my prepared background. 
 

I added some torn Aall and Create Washi Tape designed by Bipasha and then machine sewed around the edge with black thread. You can leave out the sewing step if you don't have a sewing machine. Alternatively, you could draw some freehand lines around the edges to frame it.
 

I always like to have a bit of text in the background, so with Ranger Jet Black Inkpad, I lightly stamped the Distressed Christmas stamp by Visible Image.  
 

I felt the background needed a bit of pushing back so I dry brushed some white acrylic paint in various areas. 
I stamped my Reindeer and the frame, then coloured these with my alcohol ink markers, and fussy cut out. 
 

I decided I wanted some foliage, I die cut some  dies from the Tim Holtz Sizzix Modern Festive Dies Set in 3 different coloured cardstocks. I lightly edged the coloured cardstock with matching colours and the cream card I coloured with Barn Door. 
 
 
Layering these up on my background, I glued them down once I was happy with the layout. 
 

I stamped a sentiment from Tim Holtz Stampers Anonymous Curiosity Shop CMS482 onto some craft card, glued this down, then added the whole thing to black card to frame. 
 

Finally I added this to my main foldable craft card and here it is. 


Phew! That was quite a few steps but once I’d started it just seemed to flow naturally, to move from supply to another. 

I hope you like my make and are inspired to try something either the same or similar. 
Thank you for stopping by. 
Hugs
Carol x 

Products Used:

Kate Crane Stamps 

Kate Crane Stencil

Tim Holtz Distress inks

Tim Holtz Distress Spritz Spiced Marmalade

Tim Holtz Sizzix Modern Festive Dies

Ranger Jet Black Archival Ink Pad

AALL and Create Bipasha Washi Tape 

Visible Image Distressed Christmas Stamp


Wednesday, 21 August 2024

Lace and Buttons - August DT Project 2 for Country View Crafts

Hello all,

Today is my second DT project for the August Challenge ‘Lace and Buttons on a greeting card’ at Country View Crafts and Challenges on Facebook.

You can enter 5 times each month with different projects and there is a fabulous prize of the Tim Holtz stamp set ‘Floristry’ from his latest release for this month’s prize. 
You must use products from brands that Country View Crafts stocks, and please mention them in your post. If you miss this step out, we will not be able to enter your project in the draw.

So, I had to make a 90th birthday card and so I thought I’d use this for my project. If you die cut and coloured multiple stems and made a few backgrounds, ready to go, this is a great card to have on hand when you need one.

First, I smooshed my background page with Distress Ink Tea Dye. 
Once dry, I inked up the Stampers Anonymous 'Hodgepodge' stamp with Distress Ink Frayed Burlap, Tea Dye and Rusty Hinge, spritzed with water and then placed it on my background sheet. 'Hodgepodge' is an awesome stamp for a quick background and you can also cut bits out of the stamped image to use as ephemera.


I cut this down to 5x5 inch and then using Versamark with the Stampers Anonymous 'Crochet Trims' stamp, I heat embossed a coral coloured embossing powder that I had in my stash. I did this 3 times, overlapping the last one. I blended over Distress Ink Frayed Burlap to bring out the crochet trims more. 


I die cut the Tim Holtz Sizzix Stems 664163 and coloured with Distress Watercolor Pencils and  glued these down onto the background sheet. 
 

I added a bow made from string, hot glued this on and sewed on a button. 
Finally I stamped the number 90 from Tim Holtz Stampers Anonymous Sign Painter and ‘happy birthday’ from Tim Holtz Stampers Anonymous Curiosity Shop and heat embossed these with Black Embossing Powder.
This was then added to the black border card and then the main Kraft Card substrate which measures almost 6x6 inch. 


And here’s my card. I hope you like it. 
 
 
Don’t forget the challenge runs until the end of the month. You'll have to join the Facebopok Group to be able to participate. 
Looking forward to seeing your entries. 

Thanks for stopping by.
Have a great day,
hugs
Carol x

Products used:
Tim Holtz Sizzix Dies

Tim Holtz Stampers Anonymous


Tim Holtz Distress Watercolor Pencils

Tim Holtz Distress Inks


Sunday, 11 August 2024

Lace and Buttons - August DT Project 1 for Country View Crafts

Hello all,

Here is my first DT project for this month’s theme "Lace and Buttons on a Greeting Card", to inspire you. 

You can enter 5 times each month with different projects and there is a fabulous prize this month of a Tim Holtz stamp set from his latest release.
You must use products from brands that Country View Crafts stocks, and please mention them in your post. If you miss this step out, we will not be able to enter your project in the draw.
Good luck and look forward to seeing your awesome entries.
The challenge is open worldwide as Country View Crafts do ship worldwide, but you’ll have to join the Facebook group to enter. Here’s the link: https://www.facebook.com/groups/164920247712393

So, here’s my greeting card with a Halloween Theme…

First, I die cut the elements I wanted to use from the TH Sizzix Vault Boutique 666607 set. 
I did cut out the rose and leaves but didn’t end up using these in my final make. 
For the lace doily, I smooshed some Distress Antique Linen onto an A4 sticker label before die cutting it. I also cut the frame out 3 times to make it a nice thickness. 

I spritzed some black soot and lost shadow (both ink and oxide) onto my background card. 
For the main focal background, I smooshed some Distress ink black soot, lost shadow and antique linen. Then I gave it a little spritz of Mica Stain Irongate. I then distressed the edge of this with the Tim Holtz Thread Cutter/paper Distresser and edged with Black Archival Ink.

I chose my image for the frame (this is from an Idea-ology Halloween 2023 Paper Dolls pack but you can find an image in the many paper dolls packs available. I also chose my words for the banner from the Idea-ology Sticker Book Halloween.
 
On both the focal card and my background card, with Distress black soot paint, I stencilled through some text to add interest with Tim Holtz THS149 stencil. 

Once dry, I brought all my elements together and layered up on my focal card that I’d already added to the background card. 
To finish I added the sticker words to the banner, a few white Idea-ology Bouquet flowers, and the button to the lace doily. 
 
 
I hope you like my Halloween card and find it inspiring to give it a try. You could also make this into a journal page if you wished.

Thank you for taking the time to look at my blog.
Have a great day,
Hugs,
Carol 
xx


Products used:
 
Tim Holtz Sizzix Vault Boutique

Tim Holtz Distress Inks

Tim Holtz Distress Sprays

Tim Holtz Idea-ology

Tim Holtz Stencils

Tim Holtz Distress Paint
https://www.countryviewcrafts.co.uk/ranger-tim-holtz-distress-paints-436-c.asp

Friday, 26 July 2024

Stencil Magic - July DT Project 2 for Country View Crafts

Hello All,

Here I am again with my second project for the Country View Crafts and Challenges 'Stencil Magic' theme challenge, for this month.

There's still time to enter the challenge and win a fabulous prize for this month which is a set of Tim Holtz newly released Distress Spritz Sprays, 12 in total.

The Challenge is open until the end of this month and you can find it on here: https://www.facebook.com/groups/164920247712393 

You'll need to join the group to be able to participate. The Challenges are open worldwide as Country View Crafts do ship overseas too.
You have until the end of the month to join in and can enter up to 5 times with different makes using products and brands that are stocked by Country View Crafts.
One person will be selected as the winner by the random selector generator.
 
Sooo, in the spirit of the Stencil Magic theme, I used all stencils for my make apart from the embellishments. 

First, in my Tim Holtz Splat Box, I sprayed the Visible Image Mesh It Up Stencil onto card, using Distress Spray Stains, Rustic Wilderness, Tumbled Glass and Squeezed Lemonade.I spritzed a little water too to make it spread. In my sample picture here, that's the one that's showing predominantly the green colour. I then turned the stencil face down (the side that had been sprayed through and still had spray on it) onto another piece of card and then sprayed through it with the Tumbled Glass to bring some blue into it.


So, I created 2 backgrounds with differing main colours and the way the stencil had been used. Then I had to decide which one I was going to use.
 
 
I decided to go with the blue tones one, and added a little stencilled alphabet from the Tim Holtz Mini Set THMS001, using Rustic Wilderness Distress Paint as the colour. I only added it to the two opposite corners.
 
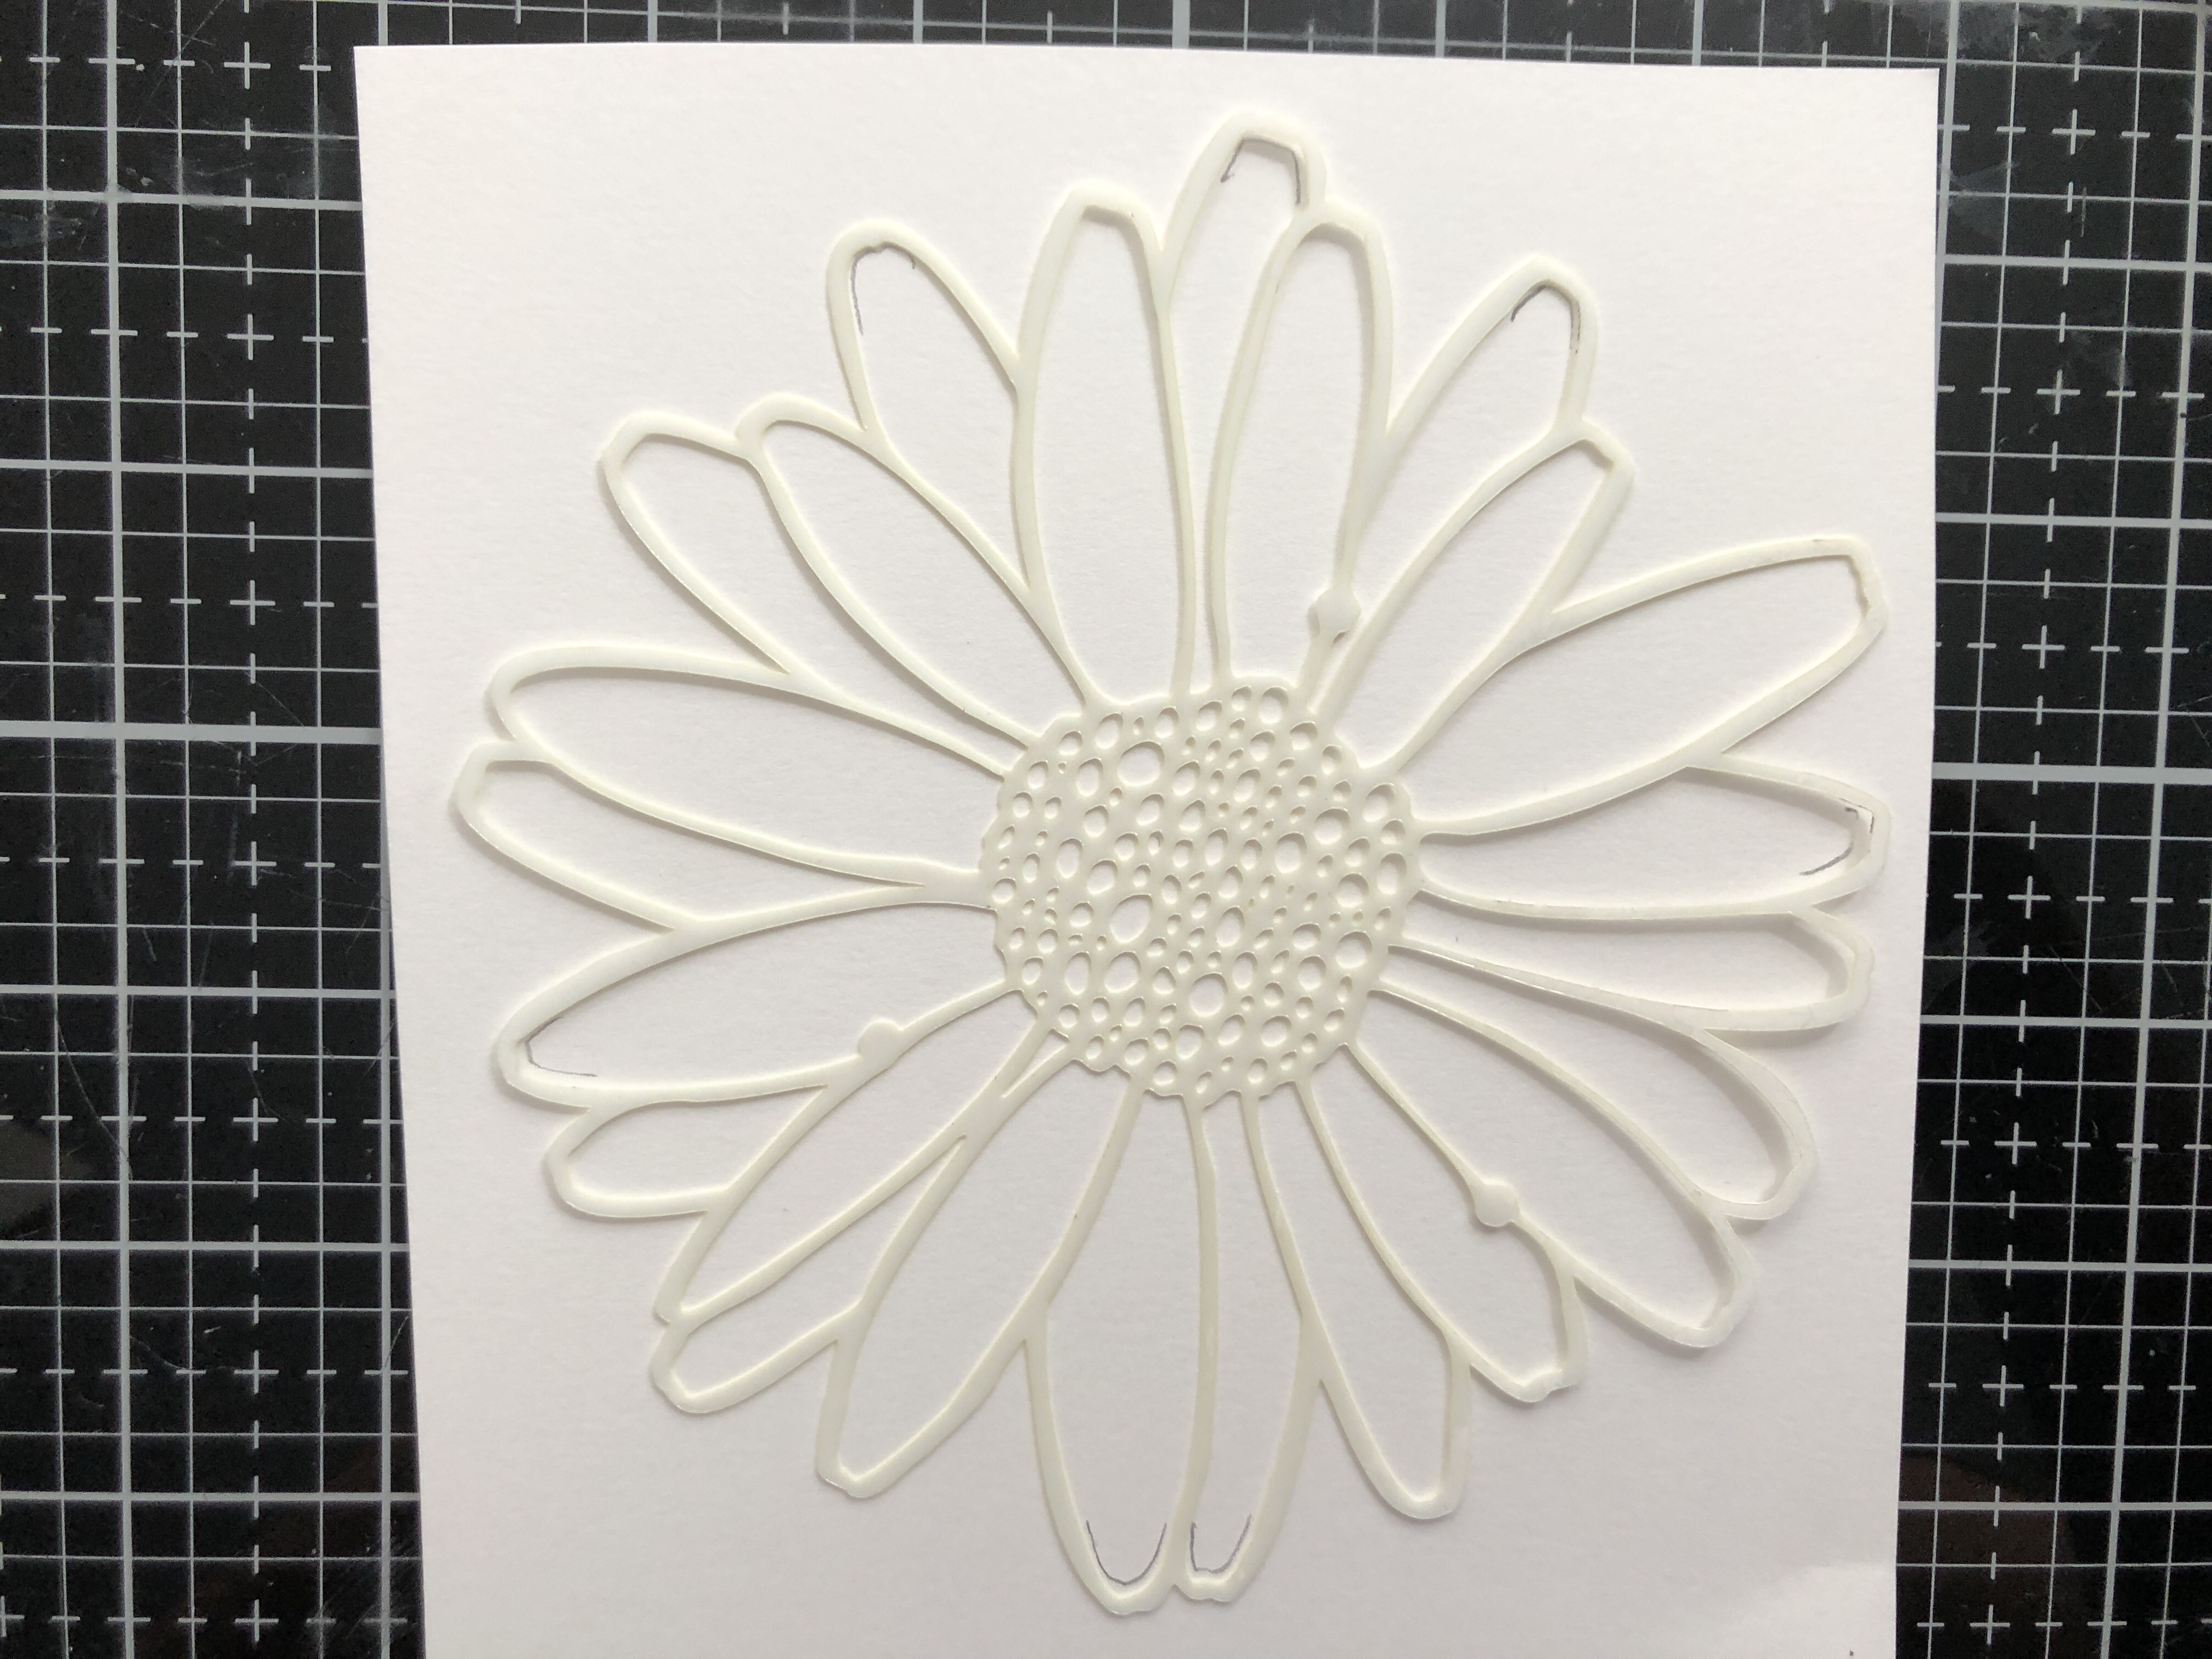
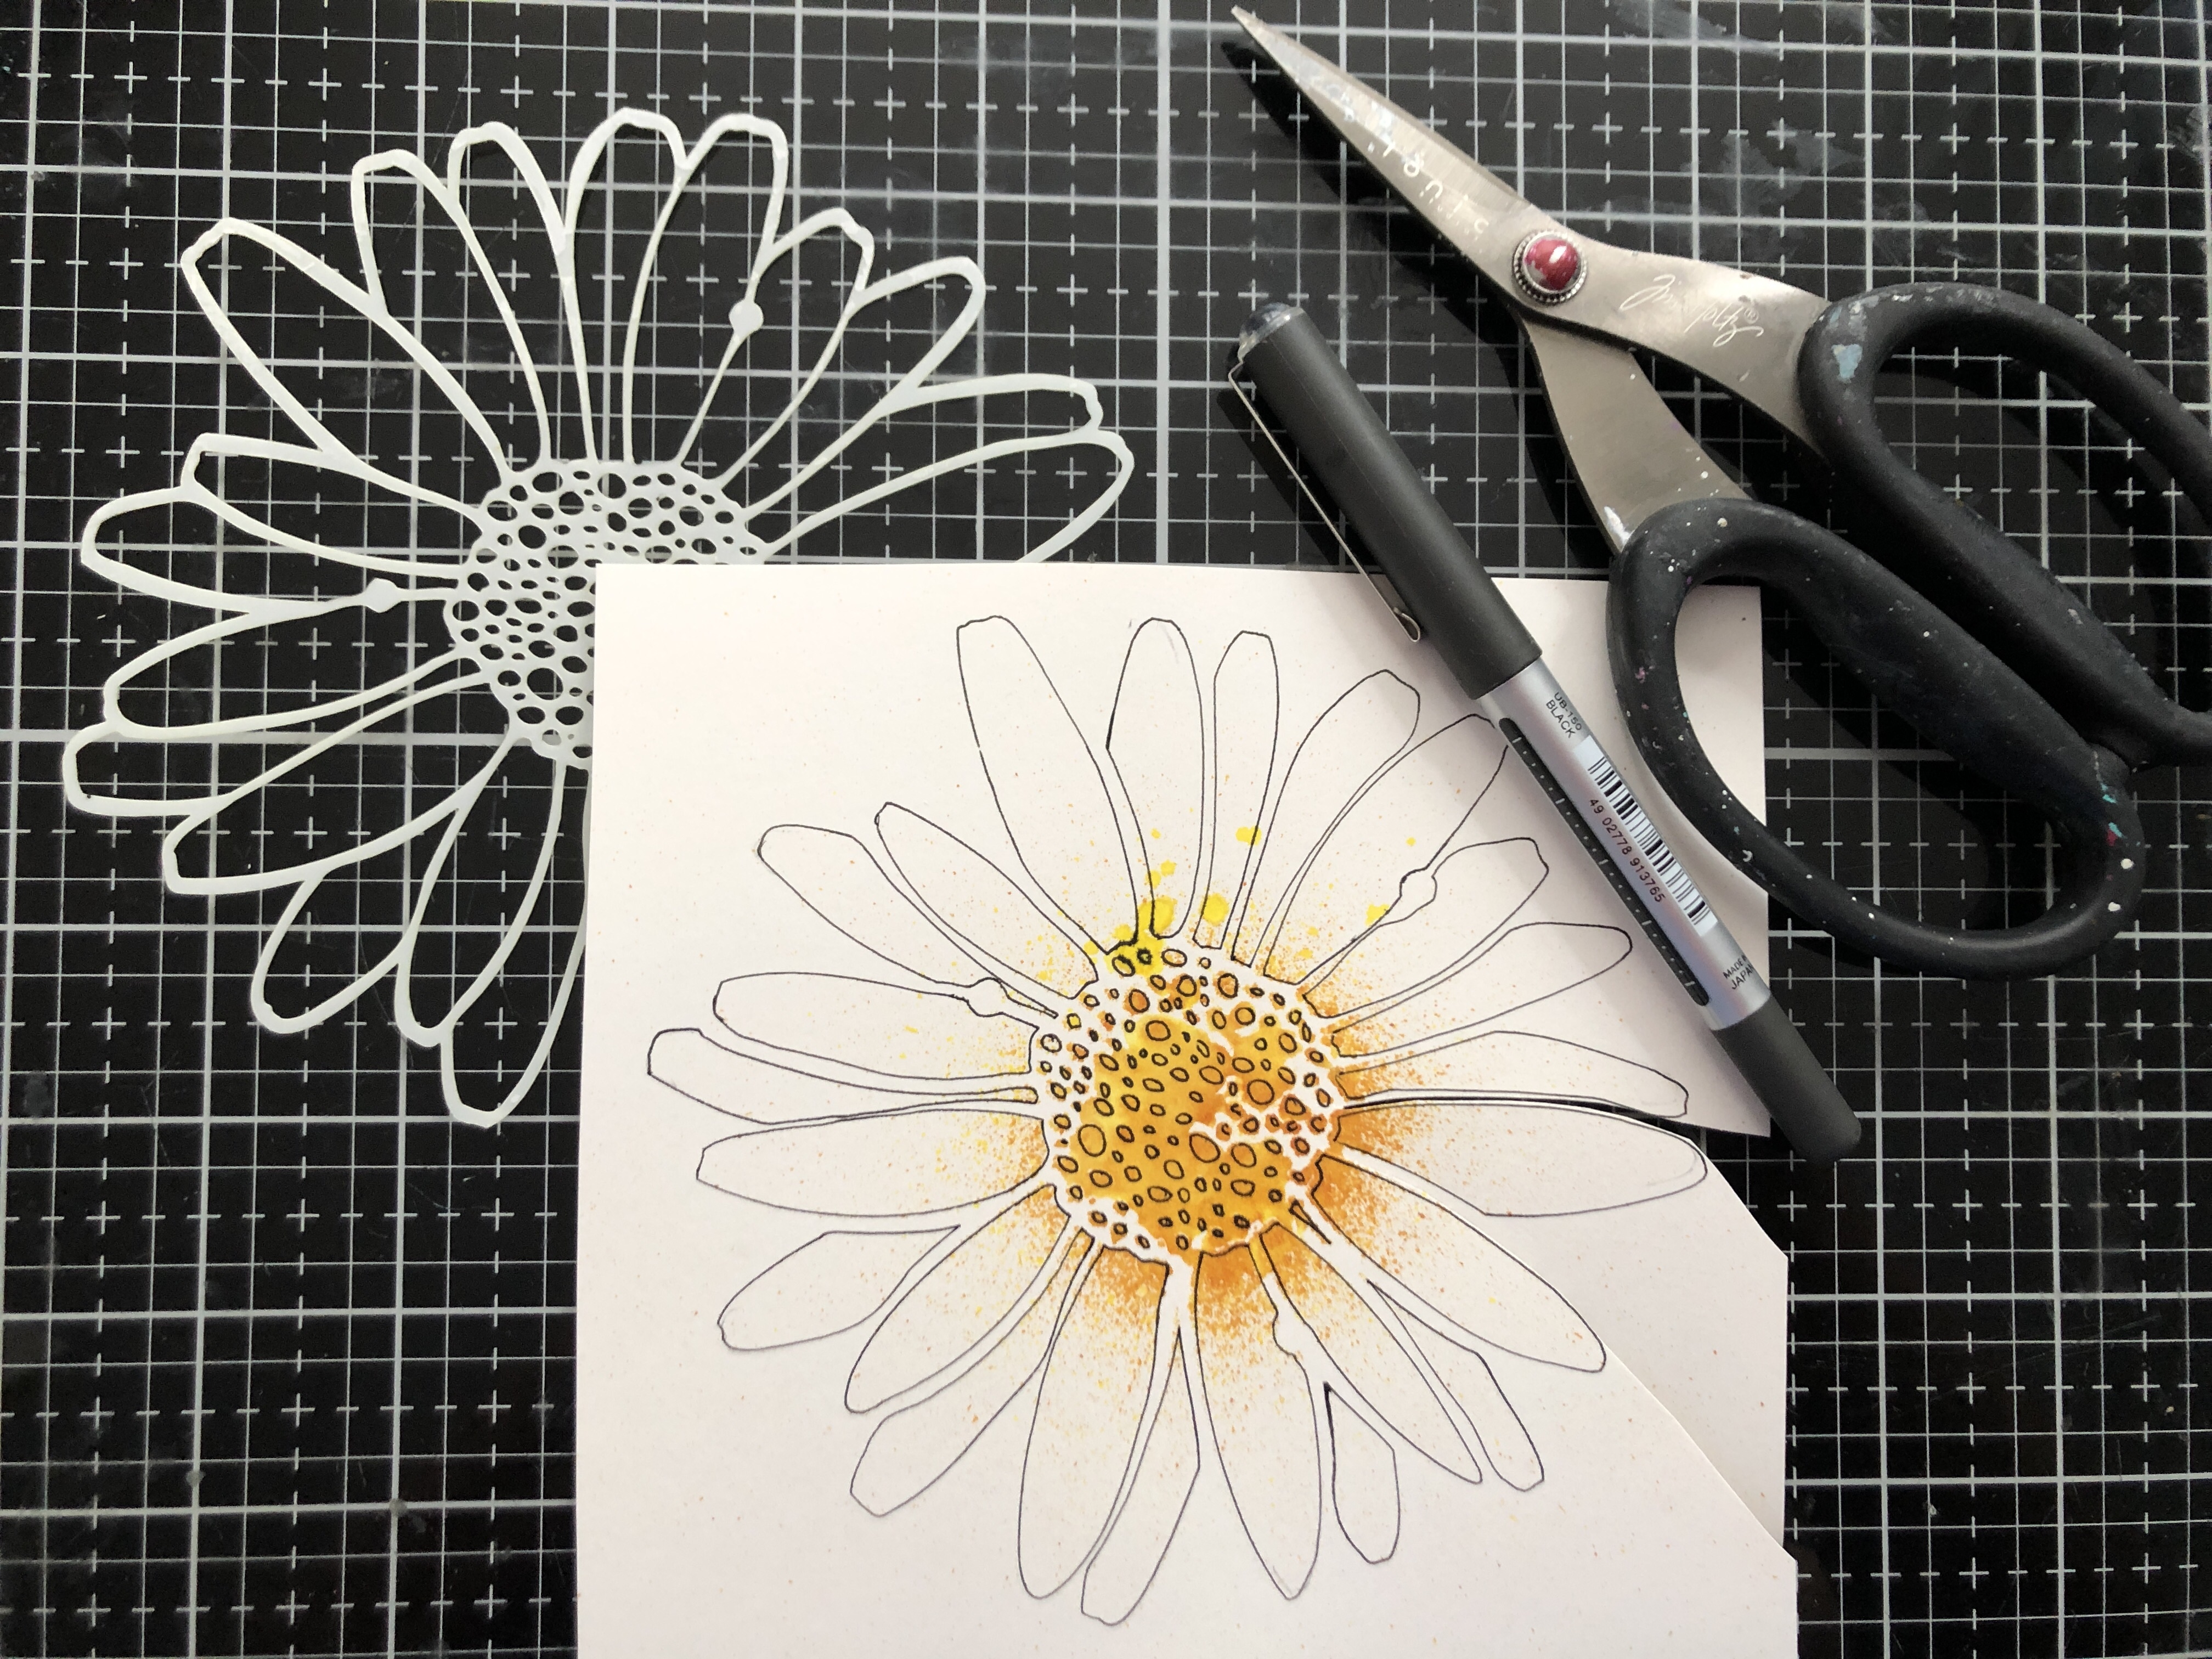
Then onto my main image. Using the Visible Image Daisy Stencil, first I lightly drew a pencil line inside a couple of the petals on the backing card, so I would be able to line it up afterwards.
 
 
In my trusty Splat box, I just sprayed some Distress Spray Stain Squeezed Lemonade and Wild Honey into the centre of the stencil. I had to do this a few times until I was happy with the centre, as the first time it totally bled under the stencil, and the second time it spread too far. I wanted to keep the Daisy mostly the white colouring.


Once dry, I placed the stencil back onto the card and lined up with the pencil marks. I taped this down with repositionable tape in a couple of places, and then drew around the inside of each petal and the centre part, with a black fine Uniball pen as I wanted the petals to be separate and stand out. I then cut around all the black outlines to get my Daisy focal image.
 

I cut my main card to almost 6x6 inch, and then the background to fit on, a little smaller than the main card, to leave an edge. I also edged the stencilled background with Tim Holtz Distress Ink Pad Rustic Wilderness.


I decided I wanted some text and an embellishment, so I used a pretty butterfly with coordinating colours from the Tim Holtz Ideaology Transparent Wings set.
I picked a sentiment from Tim Holtz Ideaology Smalltalk Sticker Book and layered this onto black card and then for both the butterly and sentiment I used some black double sided foam to raise them up. And here's my finished card....
 

I hope you like it. I had fun coming up with the idea for this and putting it all together and it shows that you can use stencils as focal images too, as well as backgrounds.
I hope this has inspired you to try it out and don't forget to enter the challenge on Facebook if you'd like to win the new Tim Holtz Distress Spritz Sprays. You have until the end of July to enter.

Thanks for taking the time to read my blog.
Have a fab day
Hugs
Carol


Products can be found here:

Visible Image Daisy stencil 

Visible Image Mesh it up stencil 

Tim Holtz Distress Spray Stains

Tim Holtz Stencil (THMS001)

Tim Holtz Distress Paint Rustic Wilderness

Tim Holtz Ideaology Transparent Wings 
 
Tim Holtz Distress Ink Pad Rustic Wilderness
 
Tim Holtz Ideaology Smalltalk Sticker Book


Wednesday, 17 July 2024

Stencil Magic - July DT Project 1 for Country View Crafts

Hello Lovelies,

It's a new project for July over on the Facebook Country View Crafts and Challenges page and it's all about 'Stencil Magic'.

The fabulous prize for this month is a set of Tim Holtz newly released Distress Spritz Sprays, 12 in total.

The Challenge is open until the end of this month and you can find it on here: https://www.facebook.com/groups/164920247712393 

You'll need to join the group to be able to participate. The Challenges are open worldwide as Country View Crafts do ship overseas too.
You have until the end of the month to join in and can enter up to 5 times with different makes using products and brands that are stocked by Country View Crafts.
One person will be selected as the winner by the random selector generator.
 
For my first DT make this month, I decided to use my Tim Holtz stencils and create a background that was subtle, yet there.
Using a piece of card that I could then cut down to the size I wanted, I stencilled across the THS183 Deco Feather stencil with Tumbled Glass Distress Ink, lining it up as I went to get one continuous image.


 Then I took the THS170 Spellbound stencil and using the Distress Opaque Grit Paste, I created a raised image over the top.


Once dry, using my trusty Splat Box, I proceeded to spray the stencilled card with Scorched Timber Distress Oxide Spray and Spun Sugar Distress Spray Stain and gave it a spritz with water to disperse the inks a bit.


I felt it needed the blue of the original stencil to be brought through a bit more, so I took a Distress Mica Spray Stain in Snow Flurries and gave it quick spritz.


Using a pink Distress Crayon, I rubbed over the stars to dull down the white and blended this in with a waterbrush. I also chose my image from the Ideaology Paper Dolls Groups and coloured these with the pink and coordinating blue Distress Crayons.


Having cut my card down to a square shape, I pretty much always like to have some sort of script text in the background, so I used a stamp from the Tim Holtz Stampers Anonymous CMS454 Gothic Tapestry set, using Coffee Archival Ink so that it would blend in.


I chose my text from the Tim Holtz Stampers Anonymous CMS446 Noteworthy set and felt this was appropriate for the two girls who are my focal point. I also cut out the main card to a 6 x 6 inch square and then the black layered card that would frame my design. I stamped the 'Collect Beautiful Moments' onto the same Kraft card as the main one and then layered this onto a piece of black too, to give it a frame.


And here is the finished piece. I really like the subtle stencilling in the background as it draws you into the card but without it being overpowering, and the 'stars' of course add a different dimention and texture to the card.


I felt that this would be a great card to give to your sister or friend.

I hope that maybe you'll give this technique a try for yourself and also join in our challenge to win that fabulous prize of Tim's Distress Spritz Sprays.


Thank you for stopping by.

Have a great day.

Carol x


Products used:


Tim Holtz Stencils

https://www.countryviewcrafts.co.uk/ths183-stampers-anonymous-tim-holtz-layering-stencil---deco-feather-173569-p.asp


https://www.countryviewcrafts.co.uk/ths170-stampers-anonymous-tim-holtz-layering-stencil---spellbound-170700-p.asp


Tim Holtz Sprays

https://www.countryviewcrafts.co.uk/ranger-tim-holtz-distress-spray-stains-696-c.asp


Tim Holtz Ideaology Paper Dolls Groups

https://www.countryviewcrafts.co.uk/th94137-tim-holtz-idea-ology---paper-dolls-groups-131400-p.asp


Tim Holtz Distress Grit Paste Opaque

 https://www.countryviewcrafts.co.uk/ranger---tim-holtz---distress---grit-paste---opaque-117198-p.asp


Tim Holtz Distress Crayons

https://www.countryviewcrafts.co.uk/tim-holtz-crayons-955-c.asp


Tim Holtz Stampers Anonymous

https://www.countryviewcrafts.co.uk/tim-holtz-stamps-by-stampers-anonymous-193-c.asp

August - DT Project 1 for Country View Crafts and Challenges - Monochrome

Hello, Happy August!  Here I am with my first DT post for August, for Country View Crafts and Challenges on Facebook.  The theme for this mo...