Hello there,
Here we are in June
already and I’m saying hello with my first DT project for Country View
Crafts for this month chosen by Zoe with the theme: Travel.
The challenge is open worldwide and you can join the group here:
https://www.facebook.com/groups/164920247712393
You must use products from brands that Country View Crafts stocks.
You
can enter 5 times each month with different projects and one winner
will be selected randomly.
There's an amazing prize of 49 and Market Wanderlust Explorer package to be won.
What
better to make than a travel notebook for the theme this month. They’re
always great to have to take away on holiday so how about making one to
take on your next trip away or to give to a friend.
The
ones I’ve made are small enough to put in your bag and won’t take up
too much room. They’re literally to jot down odd notes in - not as a
diary or journal as they’re not very big but you can insert extra pages
if you wanted it to be bigger.
To start, I
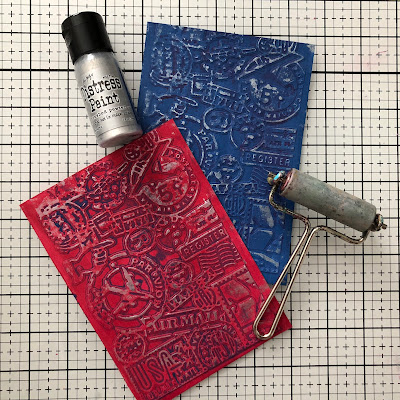
painted Distress Prize Ribbon and Distress Lumberjack Plaid over two
pieces of thick white card stock that would fit the Vault Airmail
embossing folder. I also painted the underside of these in their respective
colours as this will be the inside cover.
I painted the blue over the
embossing folder and placed my prepared red card in this and ran it
though my Sizzix machine. This gave a top colour to the raised parts of
the embossed card. I repeated with red paint on the folder and embossed
the blue cover.
Once dry, I brayered over some Distress Paint Silver Pewter to further highlight the raised parts.
I left these to dry out and then folded each one in half and trimmed round the edges.
Taking
2 pieces of white A4 100gsm photocopy paper, I folded each in half, cut
this, and then folded in half again and cut, to have 4 quarters from the A4 sheet, which I folded in half and slotted
into each other. I then trimmed these to fit the book covers. Overall dimensions are approx 7.5cm x 11cm.
I
added Lumberjack Plaid Distress Ink to the splat stamp from Stampers
Anonymous Ravens CMS310 and spritzed lightly, did a print on spare
paper and then did a second generation stamp onto the pages. I repeated
with Prize Ribbon Distress Ink for the other notebook set. I also did
some ghost prints without spritzing with water.
Once dry, I folded these in half and inserted into my notebook covers.
I
measured 3 holes onto a folded paper template that was approx 11cm -
the height of the notebook, one in the middle and two spaced either side
of this.
I placed this firmly in the centre of the pages that I’d inserted into the notebook covers.
With
the book folded together with just enough opening to get my awl in,
placing the spine on some thick greyboard, I used my awl to make the
holes through the template right through the pages and cover.
Using embroidery thread, book thread or anything that is a good sturdy
thread, I sewed a pamphlet stitch through these to secure the pages
together.
Here’s my diagram for the pamphlet stitch.
I
stamped some words from Stampers Anonymous Curiosity Shop CMS482 on the
inside pages and also the words ‘Just a Note’ onto a piece of white
card, cut this out, layered onto black card, and then cut this out. I
then glued this to the front cover of each notebook.
Finally,
with the loose threads on the outside spine, I tied a metal charm that I
had in my stash, of a boat and a plane to each notebook.
And there’s my completed notebooks for my next excursion.
I hope you’ll be inspired to have a go at making them. You can decorate them as much or as little as you like.
And don’t forget to enter the challenge on Country View Crafts and Challenges Facebook page for that amazing prize of 49 and Market Wanderlust Explorer package.
Thanks for stopping by.
Have a great day
Hugs
Carol x
Products used:
(If anything is out of stock, you can always contact Susan at Country View Crafts to see if she can order it in for you).
Tim Holtz Distress Paints
Sizzix Tim Holtz Embossing Folder Vault Airmail
https://www.countryviewcrafts.co.uk/666869-sizzix-multi-level-textured-impressions-embossing-folder---vault-airmail-by-tim-holtz-178415-p.asp
Stampers Anonymous CMS310 Ravens
Stampers Anonymous CMS482 Curiosity Shop


