Friday, 29 March 2024

Easter ATC

Happy Easter!!!

I thought I'd share with you an ATC that I made for a swap featuring 'Eggs'.  I also made some extras and used them for Easter cards.

All the products used are Tim Holtz, so if you have these, or something similar, you can make a very last minute card to hand deliver on Easter Sunday.

An ATC is an Artist Trading card that specifically measure 2.5in x 3.5in.

These are often traded amongst groups or friends and are great fun to make.


First I distress inked a background with Vintage Photo and Tea Dye Distress inks. Then I stamped the words from Tim's Mr Rabbit Stamp CMS478.

I then 'swiped' over the Distress Ink Gathered Twigs onto the 3D Texture Fades Embossing Folder Lumber 662718, put in the prepared background paper and ran it through my Sizzix Tim Holtz Big Shot Switch Plus. If you don't have this you can miss this step.

I created some inky coloured backgrounds using Distress Inks Twisted Citron, Squeezed Lemonade, Salty Ocean and Picked Raspberry.

Using the Tim Holtz Sizzix Thinlits Vault Bunny + Chick 666561 I die cut out the coloured egg toppings and some plain backgrounds for the base egg. I then glued these together.


I stamped the 5 Egg Dies stamp onto some green paper from my stash (this was made with Distress Inks Mowed Lawn and Rustic Wilderness) and compiled all the components together.

After placing these where I wanted them, I glued them down to complete my ATC, and here it is. I hope you like this and will be inspired to have a go at making an ATC, or even a card from this idea. 

 
I hope the Easter Bunny brings you delicious treats
and that you have a lovely Easter weekend.
 
Thanks for stopping by.
Carol xx
 

Products can be found here:

https://www.countryviewcrafts.co.uk/cms478-tim-holtz-cling-mounted-stamp-set---mr-rabbit-172689-p.asp

https://www.countryviewcrafts.co.uk/665301---sizzix-big-shot-switch-plus-machine-inspired-by-tim-holtz---black-147768-p.asp

https://www.countryviewcrafts.co.uk/666561---sizzix-thinlits-die-set-17pk--vault-bunny--chick-by-tim-holtz-172114-p.asp

https://www.countryviewcrafts.co.uk/tim-holtz-distress-ink--re-inkers-103-c.asp


Monday, 18 March 2024

Mr Rabbit CVC Project 2

Helloooo, 

Here I am, bringing you my second DT project for the month of March, for Country View Crafts Challenges. The challenge this month is for Mad March Hares or Rabbits or Easter. You can find the challenge on here: https://www.facebook.com/groups/164920247712393

You'll need to join the group to be able to participate. The Challenges are open world wide as Country View Crafts do ship overseas too.
You’ve got until the end of the month to join in and can enter up to 5 times with different makes using products and brands that are stocked by Country View Crafts.

Well! Who could resist Tim Holtz’s Mr Rabbit new set of stamps? Not me! 

I wanted to show you something different to try with him. As I wanted him to look the other way, I stamped him onto Acetate using Stazon and then painted him with Distress Paints, flipped the image over and here he is! 

Obviously fussy cut him and secure to the page. I composed this in my altered book using mostly Tim Holtz products but if you haven’t got exactly what I’ve used as some may no longer be available, I have given you links to other options to substitute with. 

The main reason of this project for me was to show how Mr Rabbit on the acetate could be done. And of late, I’ve started drawing my own ‘girls’, (trying to get better at drawing faces), so I hand copied Alice from an image on Google, but Visible Image have a wonderful Alice stamp and dies that you could use, or Stamperia have some fabulous die cuts, ready cut and coloured.

So, to the technique...

I stamped Mr Rabbit onto acetate with Black Stazon and then painted over this with Distress Paints - Victorian Velvet for the ears, Tumbled Glass for the eyes, Tumbled Glass and Chipped Sapphire for the bow tie, Wild Honey for the waistcoat and Peeled Paint for the jacket.


I used White Acrylic for Mr Rabbit and his shirt (I'm out of Picket Fence right now).
You have to be careful when painting over the Stazon stamped side as if you use a rough brush it will take off the ink. If you paint on the non stamped side that will keep his image as it was stamped, whereas I wanted to use it in reverse.

Once painted, flip this over and fussy cut around the lines.

 Next, I die cut the bottles and clock with Tim Holtz Sizzix Bigz Wall Clock and Apothecary dies. These are discontinued now, but I have given you some alternatives below in the products list that you can use. 

I inked the die cuts with the following Distress Inks: Old paper, Rustic Wilderness, Peeled Paint, Forest Moss, Ground Espresso, Gathered Twigs, Black Soot and I clear embossed the clock face. There were two but I only used one of these.

Then, I googled an image of Alice and hand copied her onto watercolour paper and coloured with Distress Watercolour Pencils and fussy cut her.

Next, I prepared my background in my altered book. First I gessoed the page and let it dry. Then with a wide Dina Wakley brush I randomly brushed on the Distress Paints;  Shabby Shutters, Rustic Wilderness, Scorched Timber, Chipped Sapphire and Black Soot also adding some stencilling with Tim Holtz Stencils using Wild Honey and Lost Shadow, and then added some torn bits of book page too.

Finally, I compiled all the elements - I added a 1st Class postage stamp that I had and also some 'playing cards' that I purchased as a digital download on Esty. 
I glued these all down with Dina Wakley Ultra Thick Gel Medium which works so well on Acetate Transparencies.


I hope this has inspired you to have a go at stamping on acetate and painting it. 
And also creating your own Alice in Wonderland page.
Don't forget, there’s still plenty of time to join in the challenge until the end of this month to win a fabulous prize.

Thanks for looking
Carol xx


Products used/alternative recommended: 

Acetate
https://www.countryviewcrafts.co.uk/creative-expressions---heat-emboss-acetate---a4-66629-p.asp

Stazon (to stamp on acetate)
https://www.countryviewcrafts.co.uk/stazon-tsukineko-solvent-ink-pad---jet-black-10418-p.asp

Tim Holtz Stampers Anonymous Mr Rabbit CMS478
https://www.countryviewcrafts.co.uk/cms478-tim-holtz-cling-mounted-stamp-set---mr-rabbit-172689-p.asp

Distress Paints
https://www.countryviewcrafts.co.uk/ranger-tim-holtz-distress-paints-436-c.asp

Distress Watercolor Pencils
https://www.countryviewcrafts.co.uk/tim-holtz-distress-watercolor-pencils-1598-c.asp

Background Stencils
https://www.countryviewcrafts.co.uk/tim-holtz-layering-stencils-523-c.asp

Dina Wakley Ultra thick gel medium (to secure acetate) https://www.countryviewcrafts.co.uk/dina-wakley-641-c.asp

Dina Wakley Brush
https://www.countryviewcrafts.co.uk/ranger---dina-wakley-media---112--12-2-pack--bristle-brushes-120669-p.asp

 Alternative clock to mine 
Stamperia 
https://www.countryviewcrafts.co.uk/stamperia---a4-greyboard-1-mm---cats-and-clock-128825-p.asp

Creative expressions
https://www.countryviewcrafts.co.uk/creative-expressions---paper-cuts-edger-die---cuckoo-clock-135468-p.asp 

Lady Vagabond Stamp
https://www.countryviewcrafts.co.uk/stamperia---14-x18-cm-hd-natural-rubber-stamp---lady-vagabond---flying-ship-129042-p.asp

Alternative Alice to drawing your own Alice in Wonderland
Visible Image
https://www.countryviewcrafts.co.uk/visible-image-clear-stamp-set---alice-in-wonderland-136219-p.asp
Coordinating dies
https://www.countryviewcrafts.co.uk/visible-image---co-ordinating-dies---alice-in-wonderland-167614-p.asp

Alice Die Cuts - Stamperia
https://www.countryviewcrafts.co.uk/stamperia---assorted-die-cuts--alice-forever-167992-p.asp

Alternative to my bottles
Stamperia
https://www.countryviewcrafts.co.uk/stamperia---wooden-shapes---a5-frame---corsets--accessories-147317-p.asp

Lavinia Stencil
https://www.countryviewcrafts.co.uk/lavinia---sticker-stencils---bottle-collection-6-172347-p.asp


Saturday, 2 March 2024

Mad Hares and Rabbits for Country View Crafts Challenges

Hello there,
It’s a new month and that means my first DT project has landed. What a cool theme Rachel has picked for March - Mad March Hare or Rabbit.
I thought I’d make a bookmark as they’re always very handy for that extra little gift and are so very nice when they’ve been handmade, and as Mother’s Day is coming up soon, this would be lovely to give with a book to Mum. 
Also, Easter is coming soon too, so why not make some bunny bookmarks to give as a different Easter gift?
This is the prize for March
We’ve got a fabulous prize as always at Country View Crafts, to give away for entering the Challenge here on Facebook https://www.facebook.com/groups/164920247712393
 
You'll need to join the group to be able to participate. The Challenges are open world wide as Country View Crafts do ship overseas too.
You’ve got until the end of the month to join in and can enter up to 5 times with different makes using products that are stocked by Country View Crafts. 
 
First, I assembled the products I was going to use.

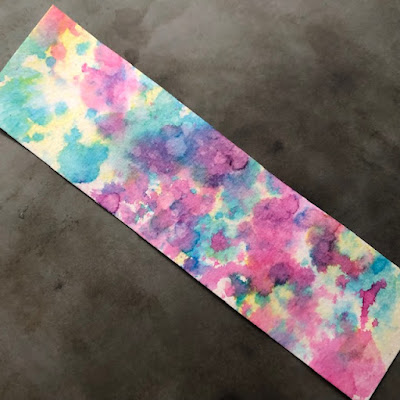
So how did I do my inky backgrounds you ask?
To start, I cut a piece of heavy watercolour card stock 2 1/4 inch x 8 inch.
First I dabbed Squeezed Lemonade Distress ink pad onto my very stained and battered craft mat. Hey, it's OK, it still works. I squeezed water onto this and smooshed it around with my finger, then randomly dabbed my bookmark card into it.
 
I let it almost dry and thenI repeated this with the Salty Ocean Distress ink pad - this time I spritzed the actual card with water afterwards to blend the colours a bit, and dabbed the overly wet parts with a kitchen towel.
 
I repeated this process with Picked Raspberry Distress Ink Pad.
 
Once dry I sprayed some water into my hand and 'flicked' it onto the bookmark, let it stick for a few seconds, then dabbed off with the kitchen towel.
 
 
Now I was ready to decorate...

I stenciled white acrylic paint through the AALL and CREATE triangle stencil and then lightly pressed the black text randomly onto it.

Then I stamped the Lavinia Moon and Lupin stamps where I felt they should be.
I did contemplate stamping these onto separate cardstock too, colouring in, in more natural colours and then sticking on top but I quite liked how the background showed through so I left it like this.

I chose a sentiment from the Tim Holtz Ideaology Smalltalk sticker book and added this, and then went over it all with Tim Holtz Distress Micro Glaze to seal it. You may have a laminator and wish to laminate it instead.

Finally I punched a hole in the top middle and found some scraps of ribbon I had in my stash to add to it.

And that's all there is to it :-)

I hope you’ll give this a go - it’s an easy make and also nice to do with children who would enjoy making these too, I’m sure. 
 
Thanks for stopping by. Have a fabulous crafty day.
Carol x


For this project I used these products:
 
Lavinia Stamps: 
Lupin
Moon
Text script - Keeping Faith

Tim Holtz Distress Ink Pads 
Squeezed Lemonade,  Salty Ocean, Picked Raspberry

Tim Holtz Distress Micro Glaze to seal

Tim Holtz Ideaology Smalltalk sticker book 

AALL and Create Stencil

Ribbon assortments can be found here

If you ever find an item is out of stock, please request to be notified when it’s back in stock, as Susan is always updating the stock levels. 


June DT Project 2 For Country View Crafts and Challenges - Travel

Hello there, Well, 'sunny' June has finally graced our shores and I’m saying hello again with my second DT project for Country View ...